You are currently browsing the tag archive for the ‘freestyle’ tag.
Swimming can be a difficult sport to learn if you’ve never been taught the very basics. One of the biggest issues most beginners face is breathing in the freestyle stroke. Even for veterans of the sport, breathing can be a nightmare if you don’t know the correct technique and method for easy and effortless breathing in freestyle.
The prospect of swallowing water can stop people from learning swimming as it can all seem too difficult after they’ve given it a shot three or four times. If you are having breathing problems in your swimming, don’t despair. There is an easy solution which can be implemented right away. Here I will outline the three keys to overcoming breathing problems in swimming.
1. Breathing out
The most important aspect of breathing technique is the breath out. The reason most swimmers choke on water is because they blow out all of their air too early or too late. The swimmer should breath to the side of the recovery arm (the arm which is out of the water) and take a big breath of air. As the head enters the water, begin blowing a small amount of air out of both the nose and the mouth. Continue doing this until just before you take your next breath. As you go to breath again let all your air out quickly through your nose and mouth just before you take that next breath. Remember that last sentence and your breathing problems should be fixed.
2. Rotation
To breath effectively it’s necessary to breath to the side. The easiest way to do this is to rotate the shoulders throughout the freestyle stroke. This makes it easier to get the mouth out of the water so not as much head rotation is required. Use your body roll and momentum to help rotate your head when breathing.
3. Stay relaxed
A secret to effortless swimming, not just effortless breathing, is to stay relaxed. Too often swimmers will tense up, hyperventilate and force themselves through the water. This isn’t how to swim fast. You must stay relaxed, keep calm and allow yourself to glide through the water. During your breathing, keep calm and allow yourself to breath normally without forcing air in and out.
There you have it, three important tips which will help you breath easier in freestyle. Remember to let all of your air out quickly through your nose and mouth just before you take a breath. Use your body roll and momentum to help rotate your head when breathing, and stay relaxed and breath normally though out the stroke.
It’s difficult trying to figure out how to flip turn on your own. Most people who begin swimming as an adult will never learn the correct way to flip turn simply because they never get taught. They go through trial and error but never seem to be able to ‘nail’ the freestyle turn correctly. There is one big mistake 90% of swimmers make when doing a turn.
.
Most swimmers will use their arms to help them flip over in their turn. As they approach the wall they put their arms in front of their head and ‘scoop’ the water in a circular motion to initiate the flip. This not only slows down their momentum but it places their arms in the wrong position before pushing off the wall. A swimmer will need to overcome a lot of resistance to get their arms into the streamline position before pushing off.
The correct way to do a freestyle turn is to bring both arms to your side after taking your last stroke. Your arms will then remain by your side as you drop your head and put your chin to your chest and perform a dolphin kick to help initiate the ‘flip’ motion. As your body is performing the flip motion, your arms will stay in the same position as when you begun the flip motion and they will go into streamline position. As your feet hit the wall shoulder width apart, your upper body will be straight and streamlined with the hands together, and your legs will be bent at the knees ready to push off. At this stage you should be on your back or slightly rotated to a maximum of 45 degrees. As you push off the wall begin your rotation to your front as you perform dolphin kick off the wall or go back into your freestyle stroke.
The most important thing is to avoid using your arms to flip over, instead keep your arms by your side as your body flips. Your arms should then remain where they were when you begun your flip, and then they will be able to go straight into streamline position as you hit the wall
I’m often asked about the different kinds of training aids for swimmers and which ones are the best to use. Here I’ve put up a brief guide to the different training aids and what they’re best used for:
 This is my favourite toy for the pool. I first bought a freestyle snorkel 4 years ago and since then I haven’t looked back. It took a couple of tries to get used to breathing with your mouth in the water (believe me it goes against everything your body wants to do!) but once I got around the learning curve they are really fun to use. To start out I had to use the snorkel with a nose clip so that I didn’t get water up my nose. Depending on how well you can control your breathing you might not need to use a nose clip at all. I’ve now got to the stage where I can use the snorkel by itself.
What it’s best used for: Kicking with a board, some freestyle drills and long slow freestyle.
Why: The snorkel is designed so you can keep your eyes looking to the bottom of the pool without moving your head and throwing your body out of line. It’s really good for people who don’t have a great technique because it can get them to practice what it’s like to swim with a straight body line. I love using the snorkel when doing kicking with a kickboard. It allows you to keep the head down and work your legs harder because your not always coming up for breath. I know most elite swimming clubs use a snorkel when doing kicking with a board.
 I must admit, I used to hate kickboards! They were awkward, they slowed me down and they were plain uncomfortable! When I was growing up we would always do kick on the side without a board. This served me well as I was still able to develop a strong kick but it was only 3 months ago which I learned why the best swimmers use a kickboard. I had always ignored the fact that swimmers like Ian Thorpe and Michael Phelps used a kickboard in training. I didn’t want to believe that it was the best way to kick! Finally after 17 years of swimming I’ve come to my senses…
My father who is also a coach was speaking to Rohan Taylor, the coach of a number of Australian Olympic swimmers such as Leisl Jones and Shane Reese and he learned why kickboards are used. It’s to strengthen the core muscles (the stomach muscles) because thats where a lot of power is generated in swimming. Since I’ve found that out, I ‘ve been using a kickboard every session and it’s starting to become an enjoyable part of training.
What it’s best used for: Freestyle, breasktroke and fly kick. Strengthening your stomach muscles (guys who want a six pack and girls who want a flat stomach then eat your heart out!).
Why: Working on the fundamentals is crucial and it doesn’t get much more fundamental than kicking. Kicking is like the propellor on a boat, it’s where your speed will come from. It may not be much fun to work on at the start but after 2-3 weeks of solid training, you’ll find you might start to enjoy it…
 Warning: only use if you’re a strong swimmer.
All the time I hear “I just bought a new pair of paddles! I can’t wait to use them!”. This is great if the swimmer is experienced and has strong shoulders and a good pull through in freestyle, but too often than not it’s a new swimmer who has gone out and bought a set of paddles because they look like a fun toy to use. I don’t blame them, I’d be exactly the same. Paddles look like fun to use but unless you can control them in the water they aren’t much use.
What it’s best used for: Strengthening your shoulders and developing a freestyle catch.
Why: Paddles are like a double-edged sword. They are great for working your shoulders and feeling a good catch in the water, but used incorrectly they can trigger a shoulder injury and send your swimming backwards. For beginners I recommend finger paddles.
 These paddles are my favourite. Beginners can use them and they force you to focus more on catching with the entire forearm and not just the hand. These paddles are used a lot with sculling drills. I’ve even seen some swimmers wear these paddles without hand straps and perform sculling drills, and the pressure of the water allows them to keep the paddles on their hands. Very cool.
What it’s best used for: Adding a little bit of power to your stroke. Sculling drills. An introduction to paddles for beginners.
Why: Finger paddles help you focus on pulling through with the entire forearm with the added power of a paddle on your fingers. For sculling drills it forces you to think about putting pressure on the water in the right position.
 Just like the name suggests, these bad boys are used for improving pull. They should only be used for freestyle and in some rare cases, breastroke drills. Pull buoys are popular among triathletes because it gets them to work on their pulling while conserving energy in their legs wich they need for the bike and run leg. For swimmers, pull buoys are a good toy to use but not too often. Some swimmers use a pull buoy for 2/3rds of a session and become reliant on a pull buoy. You don’t want to become reliant on a pull buoy. Used too often, they make you mentally switch of your abs and hips which are crucial to body rotation.
What it’s best used for: Raising your hips if they sink or are too low. Working on freestyle pull. Sculling drills. Triathletes.
Why: Pull buoys assist in having a good body position. They raise the hips which reduces drag and can help even the most average of swimmers achieve a correct body position. If you’re wanting to work on your freestyle pull in a particular set or session, pull buoys are a good way to single out your arms and a get you working on just your pull.
Hopefully that’s helped a bit with explaining some of the dozens of training aids out there. If you have any questions about any of the aids or if you’d like to know more about an aid I haven’t mentioned yet don’t hesitate to post a question in the comments box below. Happy swimming!
Last week we posted our first freestyle drill videos on the web.
Entry drill is a good drill for swimmers who are just starting out and working on their technique. Single arm freestyle is a much harder drill so most people will need to wear fins (flippers) to do it right. Remember that a drill done 99% right is the same as a drill done 100% wrong. The best advice I can give for improving your swimming is to SLOW DOWN when doing drills. Take them at a steady pace, focus on doing the key elements 100% right. I can promise you that if you learn the correct technique through drills, and you practice the fundamentals over and over and over, your swimming will change dramatically.
Here are the two videos we posted on Youtube.
The past 4-6 months have been the endurance phase of our training program. We’ve been doing more miles in the pool and higher intensity work. One thing which occurred to me is the poor kicking technique and strength in most swimmers.
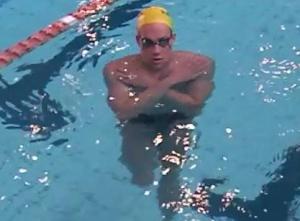
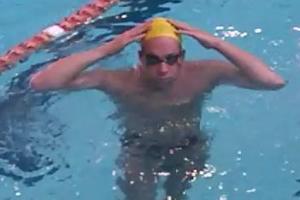
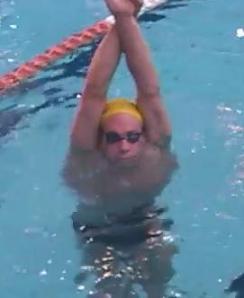
Sprinters must have a strong kick. To swim sub 30 for 50m freestyle it can be hard to do without a powerful kicking technique. Longer distance swimmers don’t rely on their kick as much as they do their body rotation and pull, so many triathletes can get away with not working on their kick in training. If you are swimming anything under 400m it’s best for you to work on your kick. One of the best drills to strengthen kicking power is vertical kick. Here we see Sam performing a vertical kicking progression:
- Arms crossed at chest
2. Hands on head
3. Arms raised
4. Streamlined
My squad will normally do 4 x 1 min with 30 secs rest inbetween. We do each step in the progression for 15 secs each. So 15 secs arms crossed, 15 secs hands on head, 15 secs forearms out and 15 secs streamlined. If you are just starting out, begin with arms crossed at chest and only progress once you’ve been doing the drill for a few days in a row.
One thing to note is there are only three types of kicks you should be doing with vertical kick.
- Freestyle
- Butterfly (flutter kick)
- Breakstroke
I sometimes see new swimmers doing egg-beater kick just because they’re new to the drill. Most people should start with freestyle kick and once they increase their endurance, then move onto butterfly kick or breastroke kick.
Once you can really master your kick, you’ll notice the huge difference it will make in your swim speed. It will feel like you have a jet engine propelling you along which you can switch on and off at will. Always remember, perfect practice makes perfect!
If you have any questions about this drill don’t hesitate to comment on this post 🙂


